This post may contain affiliate links. If you purchase through these links, we may earn a small commission at no extra cost to you. We only recommend products we genuinely love.
Why Your Mailbox Area Deserves a Landscaping Glow-Up
Your mailbox is one of the first things people see when they approach your home, yet it is also one of the most overlooked areas when it comes to landscaping. A bare mailbox post sticking out of a patch of grass does nothing for your home's curb appeal, but a thoughtfully designed mailbox garden can transform that neglected spot into a stunning focal point. Whether you have a traditional curbside mailbox or a mounted box on your porch, the right landscaping around your mailbox adds color, texture and personality to your front yard. In this guide we are sharing 25 beautiful landscaping around mailbox ideas — from simple beginner projects to elaborate cottage garden designs — so you can boost your curb appeal and make your mailbox area the highlight of your front yard.
Simple Mailbox Landscaping Ideas for Beginners
If you have never landscaped around your mailbox before, start simple. You do not need a complicated design or expensive materials to make a big impact. Even a basic mulch ring with a few cheerful flowers can transform a plain mailbox post into something that looks intentional and cared for. These beginner-friendly ideas require minimal tools, little gardening experience and just a few hours of your time. Here are three easy ways to get started.
1. Simple Mulch Ring with Seasonal Flowers
The easiest way to landscape around your mailbox is a simple mulch ring. Clear a circular area around the base of the mailbox post, lay down landscape fabric to prevent weeds, and spread a two-inch layer of mulch. Plant a ring of seasonal annuals like petunias, marigolds or impatiens around the outer edge of the mulch. This creates a neat, polished look that is easy to maintain and easy to change with the seasons. Choose brown or red mulch to complement your home's exterior colors. The mulch ring approach is also temporary and reversible — perfect if you are renting or just want to test the idea before committing to something more permanent.
2. Circular Stone Border with Petunias
Take the mulch ring concept one step further by adding a circular stone border. Arrange flat landscaping stones or pavers in a circle around the mailbox post to create a defined edge, then fill the interior with garden soil and plant petunias in vibrant colors. The stone border gives the planting area a finished, professional look and keeps grass from encroaching on your flowers. Petunias are an excellent choice because they bloom continuously from spring through fall, tolerate full sun, and cascade beautifully over the stone edges. Use a mix of pink, purple and white petunias for a soft look, or go bold with red and hot pink for maximum curb appeal.
3. Small Evergreen Shrub Base Planting
For a low-maintenance mailbox landscape that looks good year-round, plant a small evergreen shrub at the base of your mailbox post. Dwarf boxwood, compact holly or a small arborvitae provides structure and greenery even in the dead of winter. Surround the shrub with a simple mulch or stone ring to keep the area tidy. Evergreen base plantings are ideal for homeowners who want their mailbox area to look great without the ongoing maintenance that flowering plants require. Add a few seasonal annuals around the shrub in spring and summer for pops of color, or keep it purely evergreen for a clean, minimalist aesthetic that never needs deadheading.
Cottage Garden Mailbox Flower Beds
If you love the romantic, overflowing look of an English cottage garden, your mailbox area is the perfect place to create one on a small scale. Cottage garden mailbox beds are lush, colorful and full of life — packed with a mix of perennials, self-seeding annuals and climbing plants that create a beautiful, slightly wild aesthetic. The key is to choose plants with different heights, bloom times and textures so there is always something interesting happening. Here are three cottage garden approaches that will make your mailbox the most charming spot on the street.
4. Wildflower Mix Around the Mailbox Post
A wildflower mix is one of the most effortless and enchanting ways to landscape around your mailbox. Scatter a packet of regional wildflower seeds in a prepared bed around the post and let nature do the rest. You will get a colorful, ever-changing display of blooms that attracts butterflies and pollinators all season long. Wildflowers are naturally low-maintenance because they are adapted to your local climate and soil conditions. The informal, meadow-like look pairs beautifully with rustic or farmhouse-style homes. Choose a mix that includes black-eyed Susans, purple coneflowers, cosmos and coreopsis for long-lasting color from early summer through fall. Simply clear the area, scatter seeds, water and wait for the magic.
5. Climbing Roses on a Mailbox Trellis
For pure romantic charm, nothing beats climbing roses trained on a mailbox trellis. Install a small wooden or metal trellis behind or around the mailbox post, then plant a climbing rose variety at the base. As the rose grows, train the canes to wrap around the trellis and mailbox post for a stunning floral display. Choose a repeat-blooming variety like "New Dawn" (soft pink) or "Don Juan" (deep red) for blooms throughout the season. Climbing roses require some pruning and training, but the payoff is extraordinary — your mailbox becomes a breathtaking garden focal point that neighbors and passersby will admire. Add a layer of mulch and a few companion plants like lavender at the base for a complete cottage garden look.
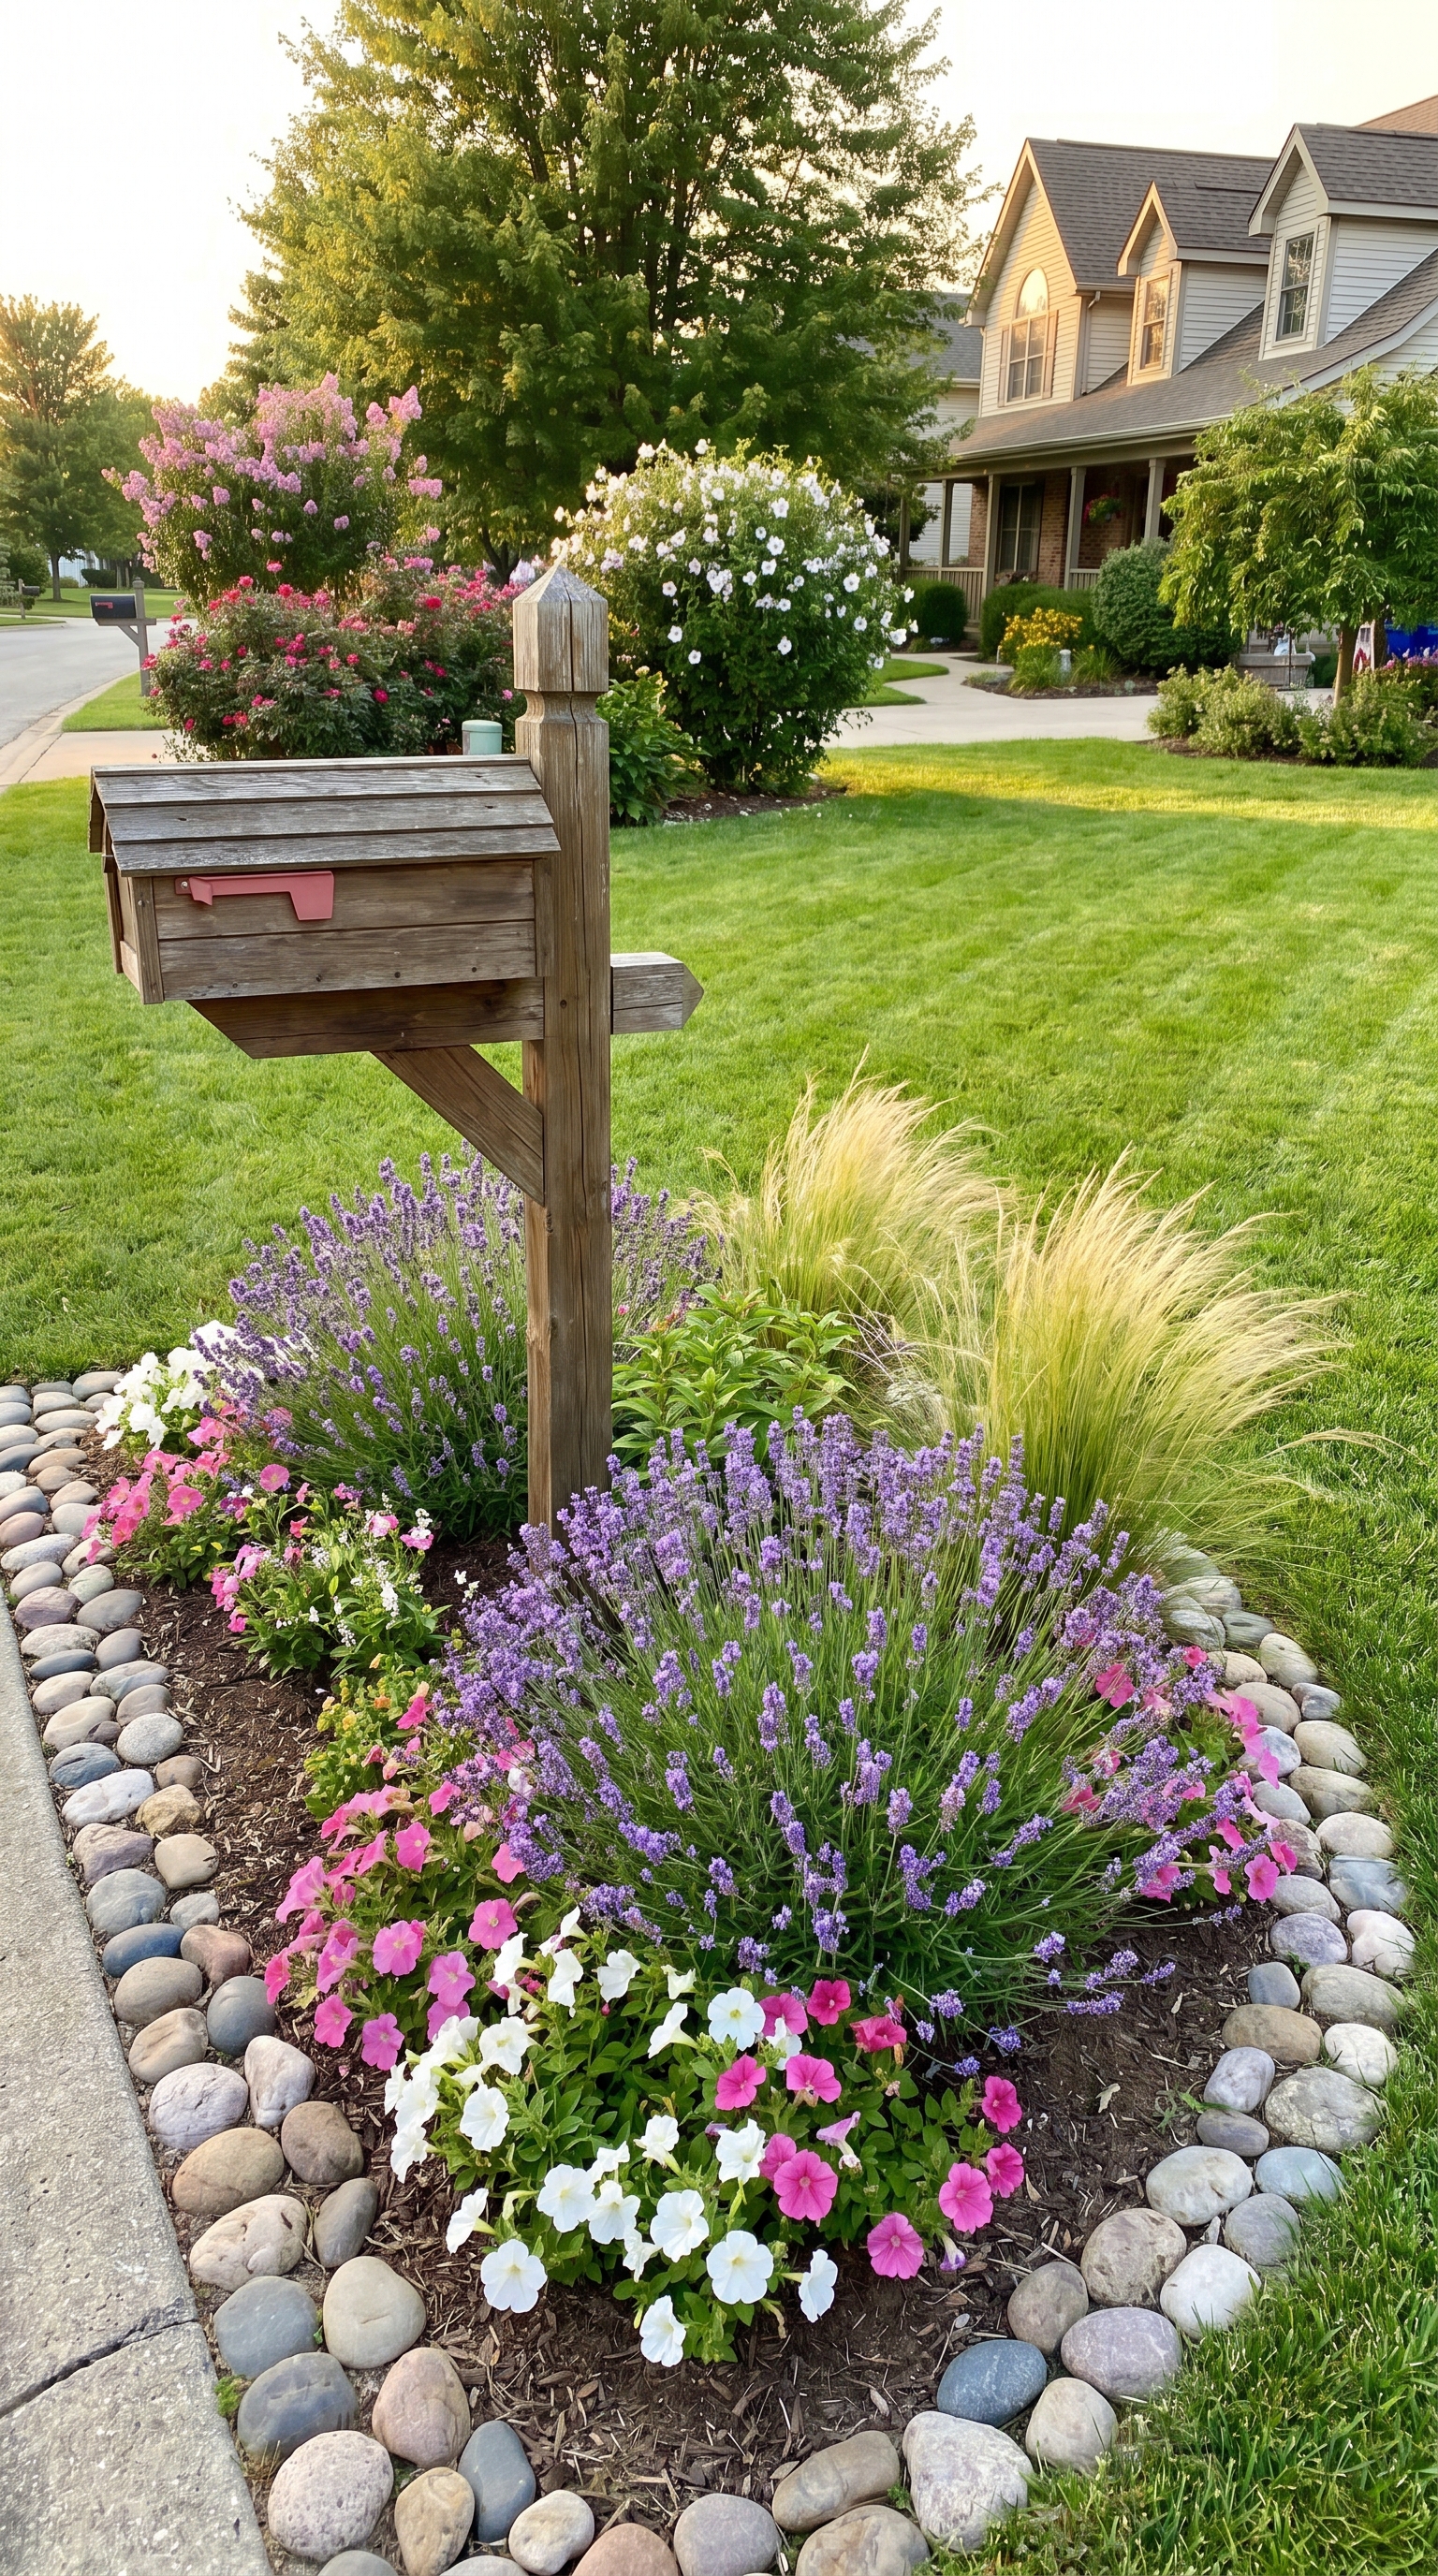
6. Lavender and Daisy Border
The combination of lavender and daisies around a mailbox creates a fragrant, bee-friendly garden that looks like it was lifted from the pages of a garden magazine. Plant English lavender along the outer edge of your mailbox bed and fill the middle with white Shasta daisies. The purple and white color combination is classic and sophisticated, and both plants are drought-tolerant once established. Lavender provides evergreen structure and incredible fragrance, while daisies add cheerful summer blooms. This pairing is especially beautiful near walkways where you can enjoy the scent as you collect the mail. Add a few decorative stones between the plants for a polished finish that also helps with weed control and moisture retention.
Low Maintenance Mailbox Landscaping Ideas
Not everyone has the time or desire to tend a fussy garden, and that is perfectly fine. Low-maintenance mailbox landscaping focuses on plants and materials that look great with minimal care — think drought-tolerant species, hardscape-heavy designs and plants that basically take care of themselves. These ideas are perfect for busy homeowners, vacation properties or anyone who wants their mailbox area to look attractive without becoming a weekly chore. Here are three low-maintenance approaches that deliver style with minimal effort.
7. Gravel and Succulent Design
A gravel and succulent garden around your mailbox is virtually maintenance-free and looks incredibly modern and stylish. Start by clearing the area and laying landscape fabric, then spread a layer of decorative gravel in a neutral tone. Plant hardy succulents like sedum, hens-and-chicks and agave directly into the gravel in strategic clusters. Succulents thrive in hot, dry conditions and require almost no watering once established. The gravel acts as both a mulch and a design element, creating a clean, contemporary aesthetic. This approach is especially popular in arid climates but works anywhere with good drainage. Add a few large decorative rocks for visual interest and you have a mailbox garden that looks amazing with zero weekly maintenance.
8. Ornamental Grass with River Rock
Ornamental grasses paired with river rock create a serene, natural-looking mailbox landscape that requires almost no upkeep. Plant a clump of fountain grass, blue fescue or switchgrass near the mailbox post and surround it with smooth river rock instead of mulch. The grasses provide beautiful movement and texture as they sway in the breeze, while the river rock gives a polished, finished look that never needs refreshing like mulch does. Ornamental grasses are incredibly resilient — they tolerate drought, poor soil and neglect with ease. Simply cut them back once a year in late winter and they will come back lush and beautiful. This design works especially well with modern, ranch and prairie-style homes.
9. Hosta and Fern Shade Planting
If your mailbox is in a shaded area — perhaps under a large tree or on the north side of your home — hostas and ferns are your best friends. These shade-loving plants thrive without direct sunlight and create a lush, green oasis around the mailbox post. Plant a large hosta variety like "Sum and Substance" as the focal point and surround it with smaller hostas and maidenhair ferns. Add a layer of shredded bark mulch to retain moisture and suppress weeds. The varying shades of green and the different leaf textures create visual interest without any flowers at all. Hostas and ferns are perennial, meaning they come back year after year with almost no effort on your part.
Mailbox Landscaping with Stones and Borders
Stones and borders give mailbox landscaping a structured, permanent feel that elevates the entire look of your front yard. Unlike mulch that needs refreshing, well-placed stones and borders create a lasting framework for your mailbox garden that looks polished season after season. Whether you prefer the rustic charm of flagstone, the classic appeal of brick or the natural beauty of river rock, there is a stone-and-border design that will complement your home perfectly. Here are three ideas to inspire your hardscape-heavy mailbox makeover.
10. Flagstone Path to the Mailbox
A flagstone path leading to your mailbox serves both a practical and aesthetic purpose. Lay irregularly shaped flagstone pieces from the sidewalk to the mailbox post, leaving small gaps between stones for creeping thyme or moss. The path defines the approach to your mailbox, prevents wear on the lawn, and creates a natural-looking hardscape element that elevates your curb appeal. Flank the path with a simple planting bed on each side — low-growing perennials like creeping phlox or sedum soften the stone edges beautifully. Choose flagstone in colors that complement your home's exterior. Sandstone tones work with warm-colored homes while blue-gray flagstone pairs well with cool-colored siding. This project can be completed in a weekend and adds lasting value to your front yard.
11. Brick Border Flower Bed
A brick border around your mailbox flower bed creates a timeless, classic look that complements almost any home style. Lay bricks in a soldier course (standing upright side by side) or a sailor course (laid flat end to end) around a circular or rectangular planting area. Fill the interior with rich garden soil and plant your favorite mailbox-friendly flowers and small shrubs. Brick borders are durable, inexpensive and easy to install yourself — you can often find reclaimed bricks for free or very cheap from local construction sites or salvage yards. The warm red tones of brick look especially beautiful with white and pink flowers. This is one of the most popular mailbox landscaping approaches because it is affordable, attractive and built to last for years.
12. River Rock and Driftwood Design
For a mailbox landscape that feels like a natural work of art, combine smooth river rock with pieces of weathered driftwood. Create a circular bed around the mailbox post, fill it with river rock in varying sizes, and arrange a few pieces of driftwood artistically among the stones. Tuck drought-tolerant plants like sedum, creeping thyme or ornamental oregano into the crevices between rocks for pops of living color. The combination of smooth stones and weathered wood creates a zen-like, coastal aesthetic that is completely unique. This design requires almost no maintenance — no mowing, no deadheading and very little watering. It is an especially fitting choice for homes near the coast or anyone who loves a naturalistic, understated landscaping style.
Seasonal Mailbox Planting Ideas
One of the best things about a mailbox garden is that it is small enough to refresh with the seasons. By choosing plants that peak at different times of year, you can keep your mailbox area looking vibrant from the first spring thaw through the last days of autumn. In spring, plant bulbs like tulips and daffodils around the mailbox post for an early burst of color after a long winter. As the bulbs fade, transition to summer bloomers like daylilies and black-eyed Susans that thrive in the heat and provide weeks of cheerful color. When fall arrives, swap tired summer annuals for hardy mums and ornamental kale that bring rich autumnal hues of burgundy, gold and purple right up to the first frost. This seasonal rotation keeps your curb appeal fresh and gives you something new to enjoy every few months without a complete redesign.
Love These Ideas?
Get more beautiful home decor inspiration delivered to your inbox every week. Join 10,000+ decor enthusiasts!
No spam, unsubscribe anytime.
Mailbox Landscaping Ideas on a Budget
Landscaping around your mailbox does not have to be expensive. Some of the most charming mailbox gardens are created on the tightest budgets using creativity and resourcefulness. Start with free materials — collect stones from your property for borders, use fallen branches as natural edging, and divide perennials you already have in other parts of your yard. Start flowers from seed rather than buying potted plants — a packet of wildflower seeds costs just a few dollars and can fill an entire mailbox bed. Check local plant swaps and community garden sales for inexpensive perennials. For affordable landscaping supplies like edging, mulch and garden soil, visit [affiliate link — budget landscaping supplies under $30]. A simple mulch ring with divided hostas and collected stones can look stunning for under twenty dollars and just a couple of hours of work.
Step-by-Step: How to Plant a Mailbox Garden
Ready to build your mailbox garden? Follow these five simple steps for a professional-looking result. Step 1: Mark your area and remove grass. Use a garden hose or rope to outline the shape of your bed — a circle with an 18 to 24 inch radius works well — then remove the grass within that area using a flat shovel or sod cutter. Step 2: Add landscape fabric and edging. Lay landscape fabric over the bare soil to suppress weeds, then install your chosen edging material — stone, brick, metal or plastic — along the perimeter of the bed. Step 3: Fill with garden soil. Add three to four inches of quality garden soil or compost on top of the landscape fabric to give your plants a nutrient-rich growing medium. Step 4: Plant your flowers and shrubs. Arrange your plants while still in their pots to find the best layout, then dig holes and plant them at the proper depth. Step 5: Add mulch and water thoroughly. Spread a two-inch layer of mulch around your plants and give the entire bed a deep watering to help roots establish.
Best Plants for Mailbox Landscaping by Region
Choosing plants that are well-suited to your climate zone is the single most important factor in mailbox garden success. In the Northeast, daylilies, hostas and black-eyed Susans are reliable performers that handle cold winters and humid summers with ease. The Southeast calls for heat-loving plants like azaleas, lantana and verbena that thrive in warm temperatures and occasional drought. Midwest gardeners should consider coneflowers, sedum and ornamental grasses that can handle extreme temperature swings and tough prairie conditions. In the Southwest, opt for desert-adapted species like desert marigold, penstemon and agave that tolerate intense sun and minimal rainfall. Pacific Northwest mailbox gardens do beautifully with lavender, heuchera and ferns that appreciate the mild, moist climate. Always check your USDA hardiness zone before purchasing plants and choose varieties rated for your zone or one zone colder for the best results.